
Generally, I find the solutions I develop become more sustainable when they have a very limited amount of customisability from the point of an end user with a more senior role such as a ‘manager’. Continue reading to hear 2 of my key tips on starting to implement user customisability in both Canvas and Model-Driven Power Apps.
Lookup Tables instead of Choice Columns
Admittedly, I don’t always stick to this practice, but it is a key simple way to go about allowing your users to edit the options they have to pick in dropdown’s and comboboxes in their apps. There are positives and downsides to this, but it proves a very simple approach to increasing customisability in Power Apps solutions.
Creating lookup tables differs based on the data source you are using in how you go about this, but generally the data structure stays almost identical with some data sources providing enhanced features and some providing more limitations.
In SharePoint Canvas Apps, you can implement this by creating a lookup column in your main data list to another list of items you want a user to be able to choose from in a dropdown in your app. Form controls will pick up these lookup items just as they do with choices, with no added work.
To be able to give users the ability to edit the choices in these lookup tables / dropdowns, you can add editable galleries to a page in your app which have text inputs and patch the data in SharePoint. You can do this using the OnChange property. When patching use the following syntax:
Patch(Datasource,Item,{Column: Data to update the column with}
Here is an example:
Patch(MyList,Gallery1.Selected,{Title: TextInput1.Text}
In the example above, I have used a dynamic text value from user input to update a value based on user control in my app.
Enabling and disabling flows in app
This is a fantastic solution to allowing users to enable and disable automated email notifications, or notifications of any type. This is especially helpful if those notifications could be sent outside of your organisation/externally. The context to this example is using a model-driven app and dataverse.
To allow users to enable and disable flows in an app in some way you can use a condition in a flow that checks a value in a table you have access to in your app. I create a table with a name something like ‘Notification alerts’. Then I simply add a boolean/ on and off column and set the labels to On (1) and Off (0). Then I create a record for every notification flow I have created and the flow has to check if the value on that record is set to true / 1 prior to following the steps to send the notification. If it is set to off, which results in the flow following the ‘No’ steps of my condition. I have a step to send a push notification back to the user who triggered the flow in my model-driven app, which makes use of the new in app notifications feature.
First I need to list rows with a query from my Notification Alerts table. The query I use is that the name needs to match the record I want to evaluate. The syntax you should use for ‘Filter Rows’ is as follows:
tableName eq 'Column Name'

I then pass a condition in a loop which runs for the 1 record my list rows step will receive which checks whether or not the state column for that record is set to true.
2. I now need to write the steps for my flow to continue based on the value being true or false. If it is true, my flow will follow the steps in the ‘yes’ part of my condition and if not it will follow the steps in my ‘no’ area.
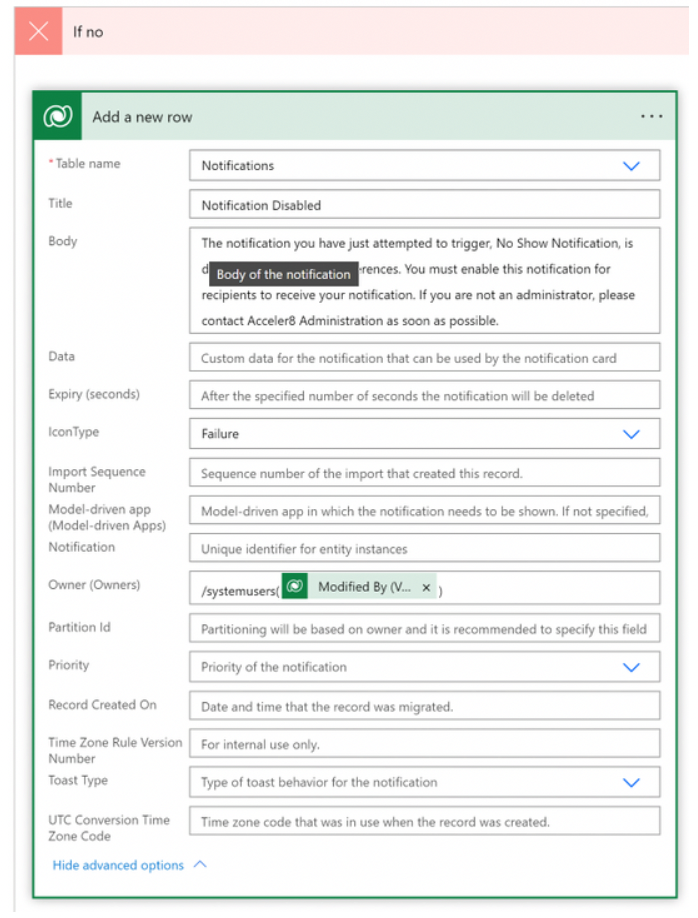
In the ‘If Yes’ step of my conditon, I will add the steps to send the notification I wish to send, and in the ‘If no’ step you can see I add a new row to my notifications table and set the owner to the person who would have triggered the flow (you should do this based on how the trigger of your flow works i.e. mine is triggered by a record change and so I need to use some data around the record to find who triggered the flow). Then if my ‘notification is enabled’ in my app via the notification record I have created, it will send the notification by following the ‘If yes’ steps, and vice versa, if not it will notify the triggering user that the notification was not sent because the ‘notification is disabled’.
Result: Admin users can enable or disable notifications from within my app and users are notified if their notification wasn’t send because it was disabled.
These are a couple of the things I implement in some solutions to add customisability for the end users, which tends to get limited to managers via security methods which I talk about in another post.
I hope this helps!