

A few days ago I posted a blog on three different methods we can use to work with delegated permissions against Microsoft Graph. Yesterday, we looked at the option of working with a custom connector. Today, we’re going to look at the option of using two HTTP connector actions in a Power Automate flow, first making a POST request to https://login.microsoftonline.com to retrieve an access token which we will then attach to a second request towards the Graph API as a bearer token to support authentication where our token holds the context of both our application and our user, enabling us to work with delegated permissions.
If you didn’t see my initial post on the three different methods we can use to achieve utilising delegated permissions when interacting with the Microsoft Graph API, check that out below.
Introduction to the 2 step HTTP approach
So let’s start by talking a bit about the approach we’re going to take here. Effectively we’re going to make two calls rather than just one to retrieve data from Graph.
These won’t be towards the same API and hence base url, but first to the Microsoft identity platform with details on the service we want to subsequently call, to retrieve an access token that we can utilise as a bearer token in the next request we will make, our request towards the Microsoft Graph API to retrieve what we’d like to from the Microsoft Cloud.
When you can use this approach
Before we start to look at achieving this approach, let’s talk about when you’d need to use this. If you’re unable to create a custom connector for working with delegate permissions against Microsoft Graph, that is generally when you should then start to opt for this approach.
Otherwise it’d be better practice to opt for creating a custom connector, for the main reasons of us not needing to secure some specific pieces of information with Azure Key Vault but also for the fact that we’d be able to work with accounts that have multi-factor authentication (MFA) enabled. This approach will not allow us to work with multi-factor authentication.
Reminder of a scenario
In yesterday’s post, we looked at retrieving calendar events for a calendar a user owns, and calendars a user has delegated access to. We will try to achieve the same thing in this blog post, using the alternative method.
App registration
The first thing we will need for this approach is the same type of app registration that we created in the last post on building a custom connector to work with delegated permissions against Microsoft Graph. Check out this post to build out your app registration before returning here.
Building the flow
In order to collect our access token there’s a number of things we will need including some sensitive details.
We will need the following pieces of information to make our POST request towards the Microsoft identity platform.
- Tenant ID
- Client ID
- Client secret
- Username
- Password
For the sensitive details client secret, and password, we’ll need to secure these and not just hard code them into our Power Automate flow, or code. We won’t look at that in great detail in this post, but make sure you do this, and enable secure inputs and outputs on steps of your flow that could reveal these details. You can refer to this post, for securing these details with Azure Key Vault.
Remember that as we are working with delegated permissions, the user in context must have access to the resources we want to retrieve from Microsoft Graph.
Getting our access token to use as a bearer token in our request to Graph
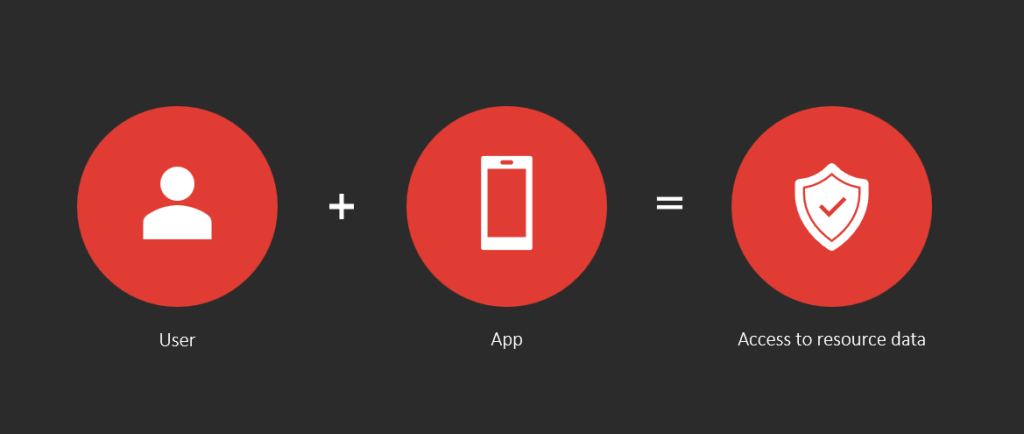
The first step we will work on is retrieving an access token which we will later use as a bearer token in the headers of our request towards Microsoft Graph. This access token will capture data on the context of the user as well as the application (client) we have created in Azure Active Directory.
So, lets start to build our flow. We will start with the following POST request towards the Microsoft identity platform.
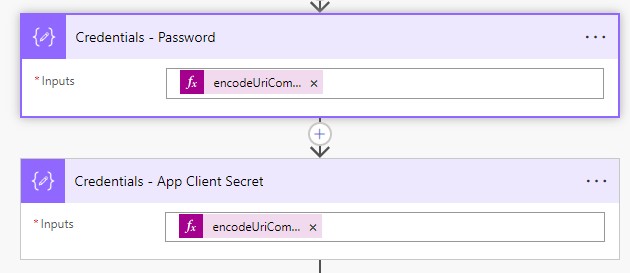
You’ll need to encodeUriComponent() function with both the client secret and password first as these should contain special characters that won’t be accepted by the request if we don’t run them though this function to start with.
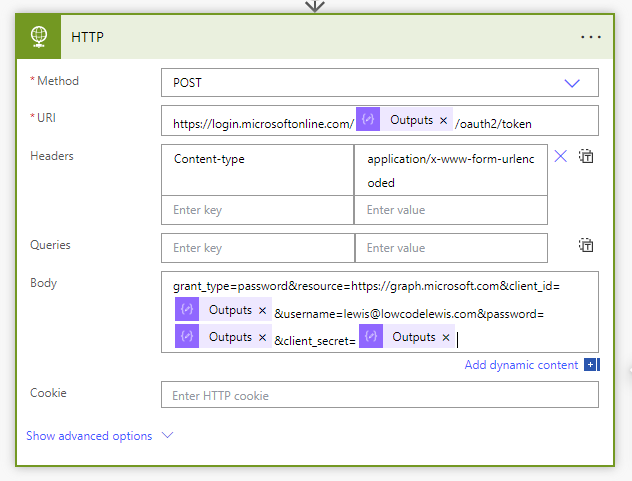
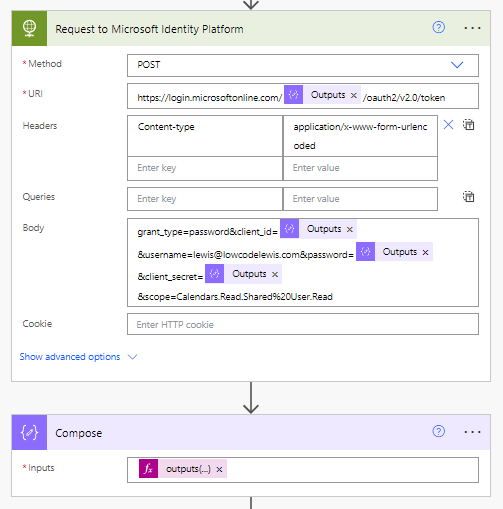
Now let’s pull things together with our POST request. I’m going to use the following request URL once I’ve set the method to POST.
https://login.microsoftonline.com/tenant-id/oauth2/token
We’ll then create a Content-type header with the following value: application/x-www-form-urlencoded
We’ll then use the following in the body of the request. You’ll need to replace the parts in the bold text.
grant_type=password&resource=https://graph.microsoft.com&client_id=your client id&username=service account username&password=the URL encoded service account password&client_secret=the URL encoded client secret
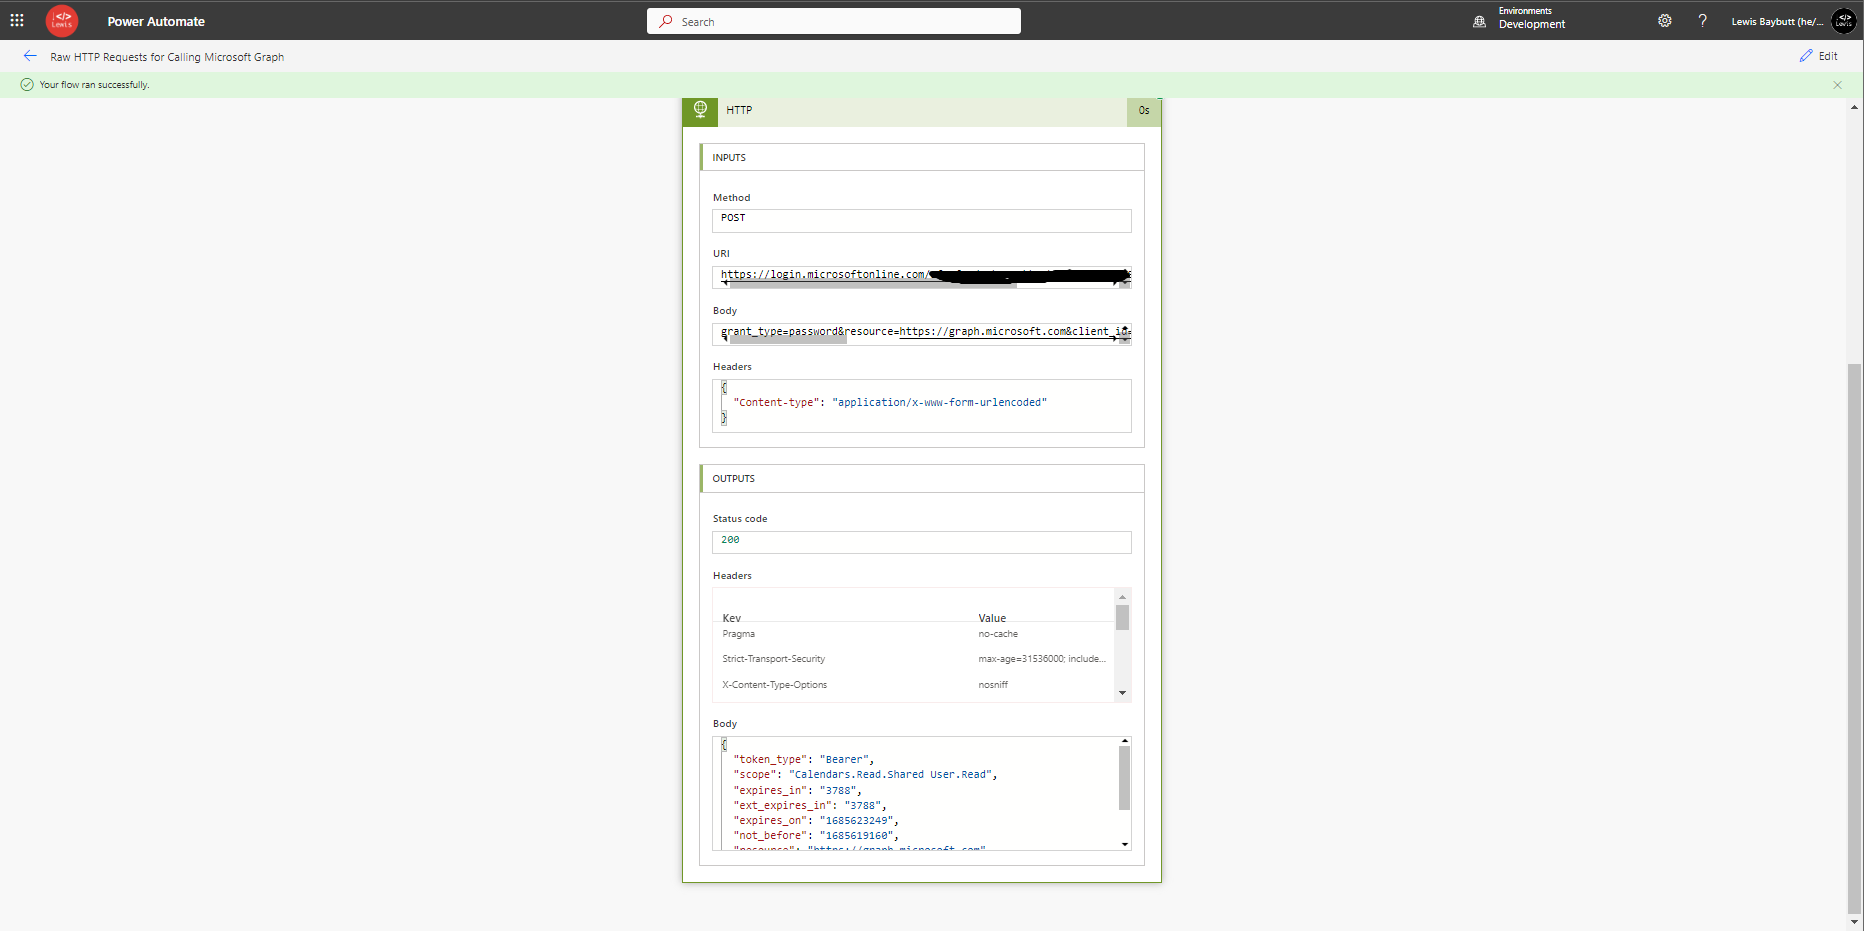
Things should look a little like this…
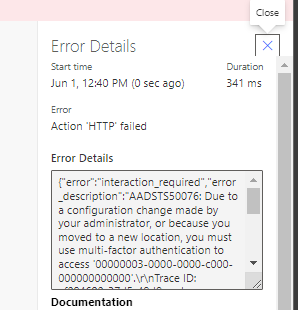
If we run our flow at this point, we should get a result like this.
If you have multi-factor authentication enabled for the user you’re attempting to use when contacting the Microsoft identity service, you’ll get an error.
Attaching the token in a request towards Microsoft Graph
So, now that I am capturing my access token from the Microsoft identity platform, with the scope to interact with calendars that the user specified has access to as an owner and as a delegate, I will now work on my second request towards the Microsoft Graph API to retrieve details I would like from a calendar.
First I need to pull the access token out of the JSON object returned in the output body from my previous call to the Microsoft identity service. We will a simple expression in a compose action to do this.
I will use this formula in a compose actions input.
outputs('Request_to_Microsoft_Identity_Platform_')['body']['access_token']Replace Request to Microsoft Identity Platform with the name of your HTTP action which does a request towards the Microsoft identity platform.
Things should now look a little more like this…
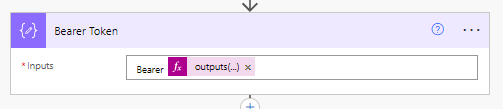
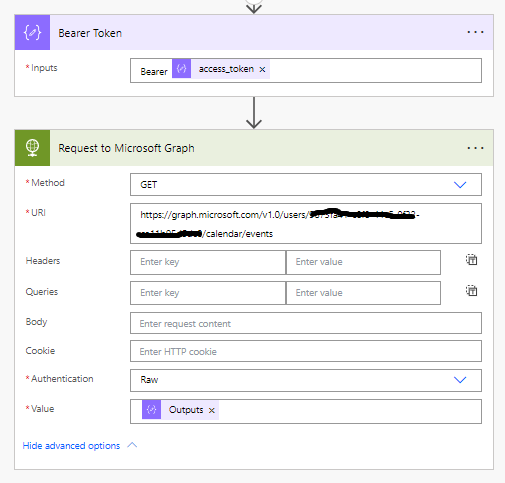
We need to always have Bearer in front of our access token before attaching it to our next request towards Graph, so we’ll add this in our compose prior to our expression which retrieves our access token from the previous step.
Next we’ll add a HTTP action for the actual request we’d like to make to make towards the Microsoft Graph API. I’ll add the following request URL for the request I’d like to make to retrieve events in a call towards Microsoft Graph/
https://graph.microsoft.com/users/{user-id}/calendar/events
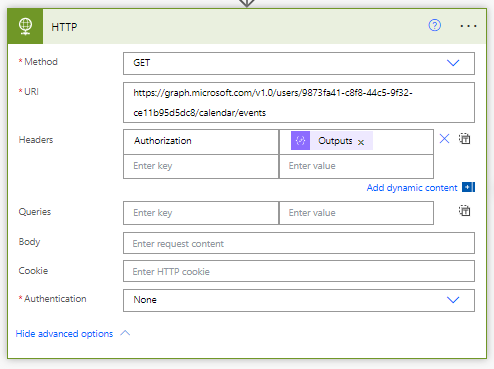
Now we have two ways of attaching our access token as a bearer token to the request. We can either use the Raw authentication method within the HTTP step, or we can add our bearer token to our request headers, which will also work.
Let’s start by setting our authentication method to Raw.
We’ll then use the outputs of our compose action holding our bearer token as the value here.
Now we will test out flow. As you can see we are retrieving the details we’d like from Microsoft Graph! Perfect!

You can also take the approach of leaving your authentication method set to none, where we will then attach the bearer token to the headers of the request where the header key will be set to Authorization.
Summary
So, now we’ve taken a look at two approaches to working with delegated permissions against Microsoft Graph! Make sure you’re subscribed to get the next approach in my next post, and to be notified of all my upcoming posts in this series.