

In today’s post, I’m going to take a look at an introduction to managed environments in Dataverse and Power Platform! We’ll start by looking at the initial enabling, creation and configuration of a managed environment and then in future posts we’ll go further into how you can take advantage of the features managed environments provide!
An introduction
So, you’ve heard of managed environments? What are they? …
Managed Environments are effectively environments that provide an additional scope of functionality allowing admins to manage Power Platform at greater scale with more control. They greatly support elements such as admin & governance of Power Platform and application lifecycle management with a lot more ease.
Primary features of Managed Environments include things such as the ability to limit object sharing, weekly usage insights of objects such as apps, enhanced data policies, and the ability to make ALM easier with Power Platform pipelines.
Licensing prerequisites
So, lets take a step back before we get to carried away… and let’s talk about the elephant in the room. 👀
Licensing. Always the fun topic, hey? … Hey?
To utilise apps in managed environments, every user wanting to take advantage of resources in that environment must have a Power Apps per user or per app license, or a license such as a Dynamics 365 customer engagement license that comes with premium Power Apps usage capabilities.
When it comes to utilising or running flows in Power Automate, where these are in managed environments, all users must have a Power Automate per user license, a Power Automate per flow license or a Dynamics 365 license which includes premium Power Automate usage capabilities.
So basically… everyone has to have a premium license!
Enabling managed environments
So let’s create an environment in our tenant, and then enable it as a managed environment to enable increased visibility and scalable control for our organisation!
- Go to the Power Platform admin centre
- Select environments in the left hand pane
- Select new to create a new environment, or you can skip this step if you already have an environment that you want to make a managed environment.
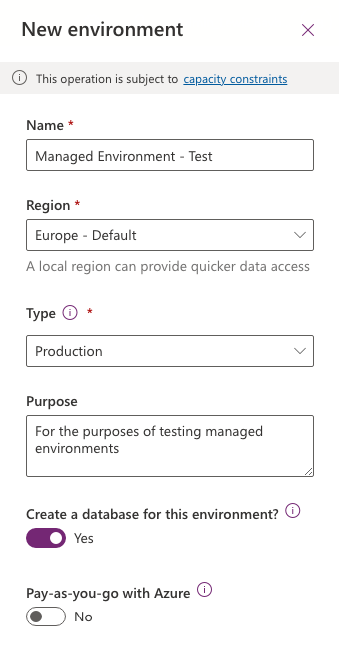
Now once your environment is ready, we can enable it as a managed environment 🙂
Select the environment and click ‘Enable Managed Environments’
Limit Sharing
Once you’ve clicked enable manage environments, you’ll see we have a number of things we can configure straight away!
The first thing we can look at is the ability to limit sharing of canvas apps in our environment.
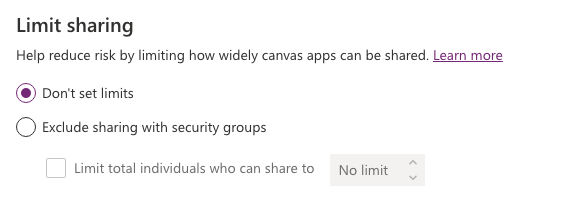
The options here are to not set any limits, or we can exclude the ability to share with security groups or ‘all users’ and then we have the option to limit the total number of individuals an app can be shared with. Either we can specify a numeric value here or not limit the number of people, but we can’t shared with security groups if this option gets enabled.
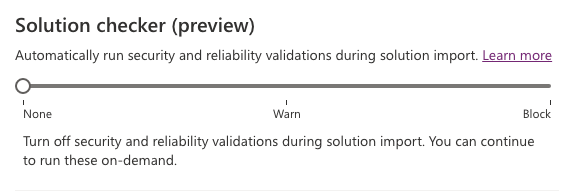
Solution checker
The next set of options we have to look at are the options around solution checker. These options effectively let you enforce the use of solution checker during deployments with a few different options. The first option being none doesn’t enable this feature but there are then the following options…
- Warn – all solutions are verified during import with a warning of any critical issues found, and a further email after a successful import to power platform environment admins with details of the solution validation.
- Block – all solutions are verified during solution import where solution imports are cancelled where highly-critical issues are found with the same email sent to admins with solution validation information.
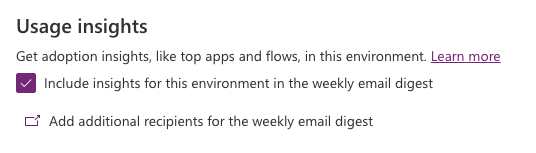
Usage insights
A further option when creating managed environments is the ability to turn on usage insights in the weekly email digest for this environment which comes as one of the features of managed environments. There is also the ability to add additional recipients for these emails.
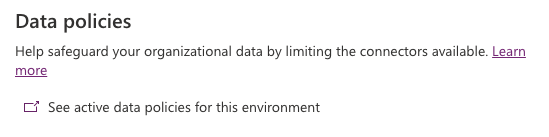
Data policies
Finally you have the ability to see a view of all of the data policies created against the environment you’re enabling as a managed environment. You can control these by selecting the link to see a filtered view of these policies for the selected environment.
Finishing up!
Now select enable and your environment will be enabled as a managed environment!
Hopefully you found this post helpful with understanding how to enable an environment as a managed environment. In future posts we’ll look at what you can now get out of this managed environment and how things work!