

Do you find it tedious to have to create a Power Automate flow to achieve things you need to do in Power Apps, that aren’t so easy out the box, or that don’t seem so possible? One of the things I came across recently and that we looked at in my last blog post in this series on Microsoft Graph and utilising the wider Microsoft Cloud ecosystem when building with Low Code, was the ability to make a GET call towards Microsoft Graph without needing to use a Power Automate flow and a HTTP step.
In this blog post, we’ll get a bit more complicated and we’ll look at achieving a POST call towards Microsoft Graph directly from Power Apps utilising the HTTP with Azure AD connector.
If you’ve been enjoying this series on Microsoft Graph, make sure you subscribe to my blog to get my posts delivered straight to your inbox as soon as they’re published! 📧
SubscribeScenario Recap
So, in my last blog post, we attempted to retrieve tasks from Microsoft To Do into an app. We did this and listed them in a gallery. If you haven’t taken a look at that yet, or you don’t know how to do it, take a look at the post below.
In this post, using a POST request, we’ll attempt to create new tasks in Microsoft To Do using Power Apps. This might not be your requirement and the resource you want to interact with via Microsoft Graph, but this will give you a generalised idea of how to make a POST request towards Microsoft Graph using Power Apps, without the need for a Power Apps triggered Power Automate flow.
HTTP with Azure AD
Let’s also recap on the capabilities of the HTTP with Azure AD and how this works when we interact with Microsoft Graph.
By using this connector, we’re providing our requests to Microsoft Graph with the context of the user. This means we’re working with delegated permissions, and using this connector you’ll be able to access supported endpoints, retrieving and interacting with resources that you, or the connected user, in question, has access to.
You won’t be able to interact with resources in Microsoft 365 or the Microsoft Cloud using this connector if you don’t as a user have access to the resources. This connector will hence also only work with resources that can have permissions scoped to a user.
InvokeHTTP
Within the HTTP with Azure AD connector in Power Apps, we’re able to use InvokeHTTP to make a request towards an Azure AD secured API such as Microsoft Graph. Let’s take a look at the syntax for this in Power Fx.
HTTPwithAzureAD.InvokeHttp(“Method”, “Request Url”, {headers:}, {body:})
Parameters
Now let’s take a look at each parameter within the action above to understand what we need to populate these with.
Method
First within the InvokeHTTP action we’ll need to provide the method of the request we want to make in double quotes. Intellisense will suggest the methods that can be used here. In this scenario, we’re going to use the POST method, so we will populate this as “POST”.
Request Url
Here we need to input, within double quotes, the request url we would like to use to call Microsoft Graph. In our case we’re going to use the following request Url to add a task to a certain list within Microsoft To Do.
https://graph.microsoft.com/v1.0/me/todo/lists/listId/tasks
In the above request url you’ll need to replace list Id with the Id of the list you want to add your task to. We can get an Id for our list using the following call to return all lists, then look for the Id within each list object.
https://graph.microsoft.com/v1.0/me/todo/lists
Headers
For the headers parameter, this is where we can populate the request with headers we might need to use. We don’t need to use any for the request we’ll make here to create a task, but if you need to attach headers to your request you’ll need to provide a Table of them within this parameter.
Body
Finally we have the body of our request which is where things get slightly more complicated as the data type requested by Power Apps here is a Blob. For this we’re going to need to utilise Azure Blob Storage. We will need to create the JSON object we’d like to use in the Body of our request in a code editor such as VS Code then we’ll need to upload that file as a blob in a storage container in Azure.
Then in Power Apps, we will be able to get the content of that file in Azure Blob Storage and store it in a global variable to populate the Body parameter with, as the data type Blob.
Creating a container in a storage account
Now let’s work on creating the location to upload our JSON file in Azure. You’ll need a storage account to work with for this. If you don’t know how to create a storage account in Azure, check out the content below to learn how to do this.
Create a storage account – Azure Storage | Microsoft Learn
Now within your storage account, head to containers under data storage. Then select Container which has a plus icon to the left of it.
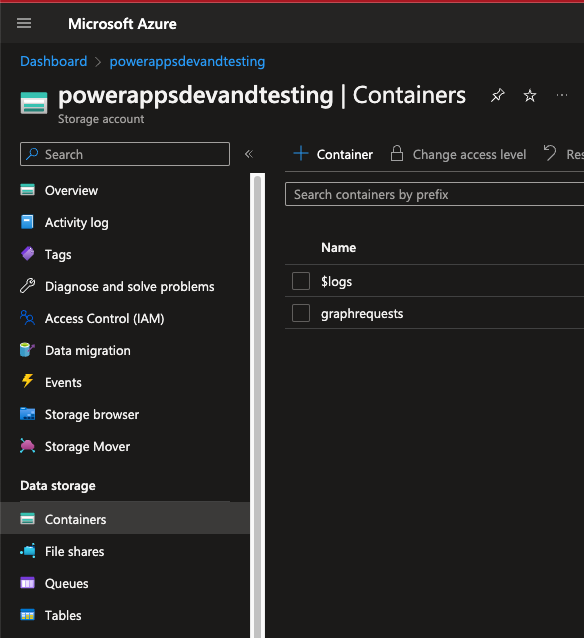
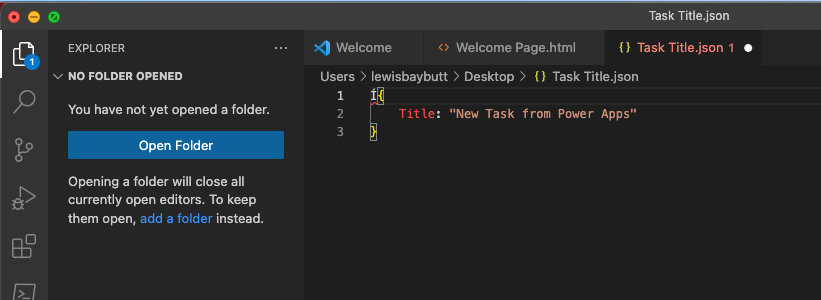
Simply give your container a name and leave the other inputs as they are defaulted to. Select your container and you’ll see an area to upload files as blobs. Let’s head over to Visual Studio Code to create a file to upload here.
In Visual Studio, simply create a JSON file with an object using the following syntax as a test. We’re hard coding everything for now to understand how this functionality works, and we’ll look at making dynamic or soft coded requests in a future blog post.
Now upload the file you’ve saved into your container. Then we’ll go back to Power Apps.
Create a connection to Azure Blob Storage
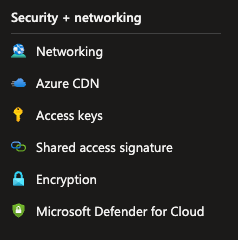
Before we add the connection in Power Apps to connect to Azure Blob Storage, we’ll need to get a key from our storage account which we can use to create the connection. To do this navigate to the storage account and select access keys under Security + Networking.
Now show the key under key1 and copy the value. We’ll use that to create our connection along with the name of our storage account, so copy that too.
Now in Power Apps, create a new connection for Azure Blob Storage and add it as a data source. You’ll need to select the authentication type as Access Key.
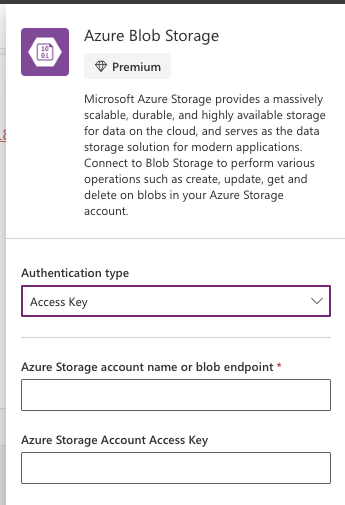
Then you can paste in your storage account name and the key that you copied from Access Keys too. This will create your connection to Blob Storage.
Setting a variable with the blob file content
Now we will need to get the file content as a blob and set this into a global variable to use in our POST request.
To get the file content we can use the following syntax.
AzureBlobStorage.GetFileContent("blobId")To get the id of the file or blob you uploaded you can create a gallery in your app that lists the blobs/files in a container. You can use the following syntax in the items property.
AzureBlobStorage.ListFolderV4("storageAccountName","containerName").valueThen add a label to your gallery which references the Id property of the objects returned, and copy the Id from the record you want to use which is your JSON file uploaded to your file container.
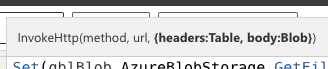
We will set a global variable with our blob using the following syntax.
Set(gblBlob, AzureBlobStorage.GetFileContent("blobId"))Next we can use the global variable in our request using the HTTP with Azure AD connector.
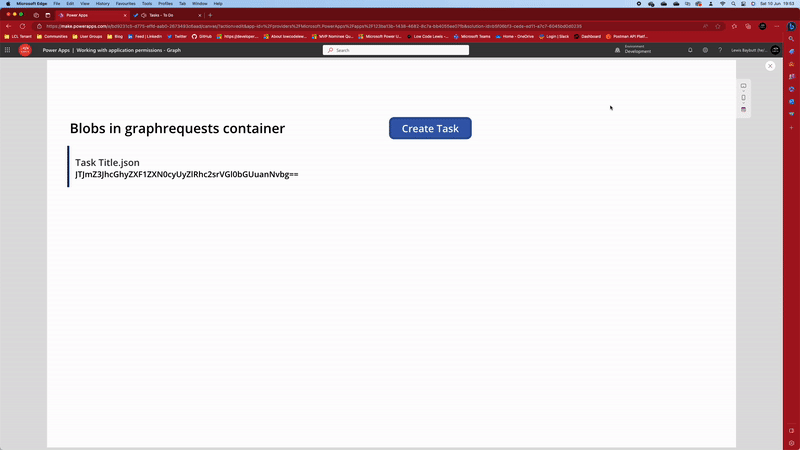
Your formula should look something like this. I’m using this in the OnSelect property of a button to trigger the operations.
Set(
    gblBlob,
    AzureBlobStorage.GetFileContent("JTJmZ3JhcGhyZXF1ZXN0cyUyZlRhc2srVGl0bGUuanNvbg==")
);
HTTPwithAzureAD.InvokeHttp(
    "POST",
    "https://graph.microsoft.com/v1.0/me/todo/lists/AAMkAGU3NzIwNWFjLWJlNmQtNGVmNC1iMDE1LWY3OGY3OGM5Yjc3YgAuAAAAAAB9TglYn3hKT4n8NFbw1EjzAQB70ujZt1ZlRKwOD_8MoWi8AAAAAAESAAA=/tasks",
    {body: gblBlob}
)
Now if I select my button which says Create Task, I’ll see my task created in Microsoft To Do with the title “New Task from Power Apps” which is what I specified in my body file when I created it in VS Code.
Awesome! Now we’re making POST requests to Microsoft Graph successfully without the need for Power Automate.
Summary
Now, whether this is the easiest and correct approach to take, is a different question to what is possible. Personally I’d find it easier to just add a flow into my app and use the HTTP with Azure AD actions in Power Automate to do this as it doesn’t require the need to use Blob Storage. However, if for some reason you aren’t able to use Power Automate, this might be an option for you.
In a future blog post we’ll take this idea and we’ll improve it by soft coding elements so that we could use this approach in an actual solution. Right now with everything hard coded, this isn’t overly useful yet, but hopefully from this post you got an idea for the functionality and how we can achieve making a POST request towards an Azure AD secured API without the need for Power Automate.
Make sure you’re subscribed to my blog to get my upcoming posts on Microsoft Graph and all future ones on Low Code, Microsoft Cloud and more. 📧