

Hello context building friends! 👋 Welcome back to part 4 of building the revision and assignments planning solution for students to use and save time when planning in their tasks from both teachers and their personally set goals!
In this solution build we’ve been working on an application that can surface Microsoft Teams assignments and allow students to plan them into their schedule, as well as custom revision tasks. Here we’re using context from Microsoft Graph to surface this Teams data and make it easier for students to schedule in this work, without having to manually copy out the details from Microsoft Teams into Outlook.
In this post, we’re going to continue building this solution, and we’ll be working on the element of surfacing Teams assignments on our task creation screen. We’ll also work on auto populating our task creation form with the details of a Teams assignment when we select one from the list! 💖
Surfacing assignments
So in the OnVisible of our screen I’m going to add the following formula just to refresh our assignments by doing a call to Graph utilising the custom connector we’ve already added into our application.
Set(gblMyAssignments,'My Assignments'.getmyassignments().value);
Now I’m going to copy the Fluent Details List component from my home screen and paste it on my New task screen.
I’m going to resize it a bit to fit once I’ve pasted it on my New task screen. I’ll also change some properties which are highlighted in the right hand sidebar.
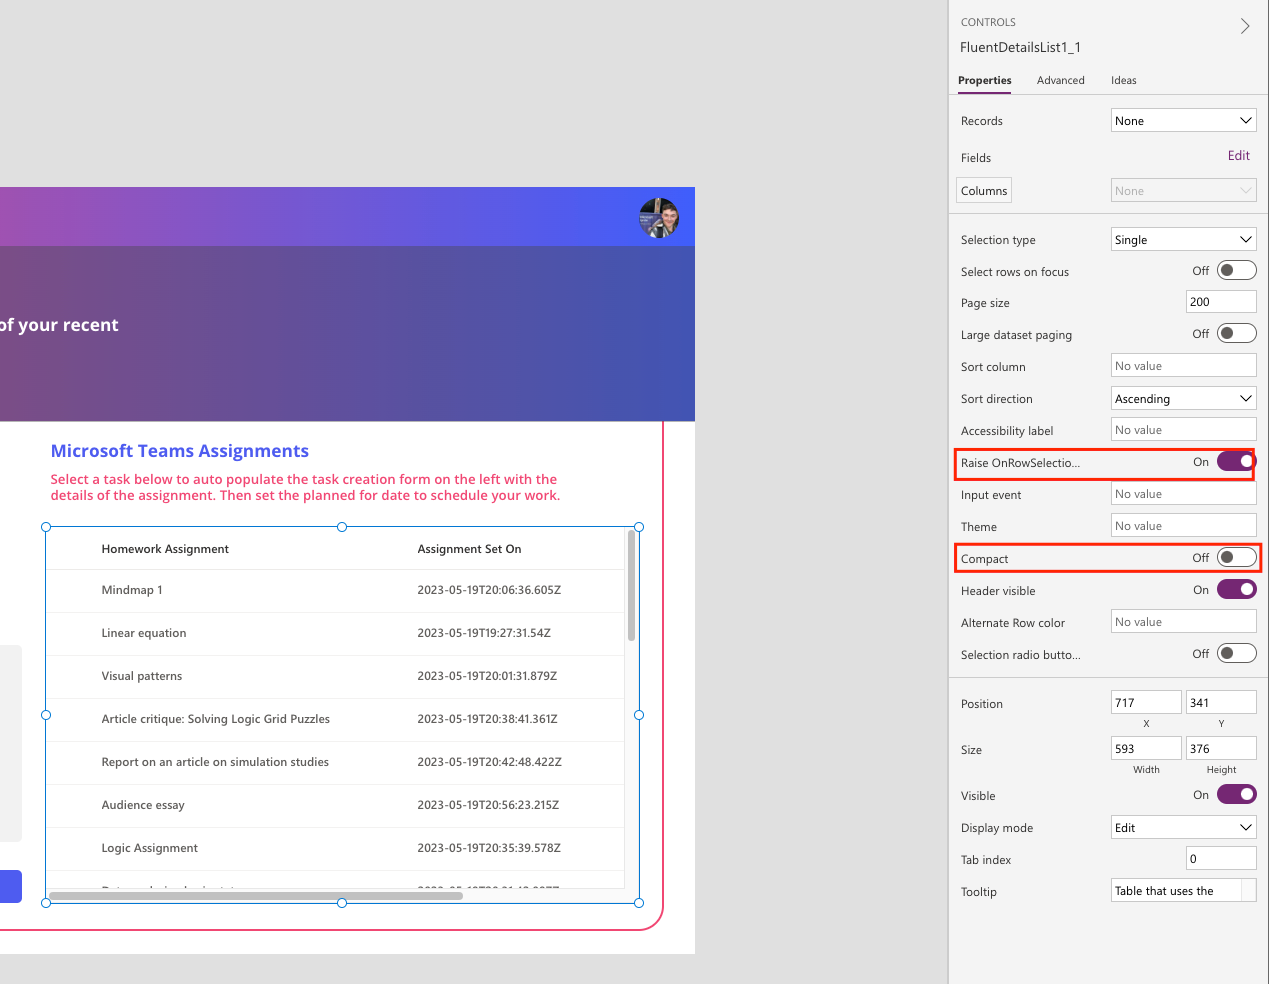
I’ve set the RaiseOnRowSelectionChangeEvent property to true and I’ve set the Compact property to false to space out the records a bit.
Now I’m going to use the following code in the OnSelect property of my details list control. This will be part of the code that copies the following details about the assignment to the calendar event providing context about the work in the calendar event saving students time again, rather than them having to manually cross reference with Microsoft Teams.
Set(gblDefaultTaskTitle, FluentDetailsList1_1.Selected.displayName);
Set(gblNewTaskHomeworkSelected,true);
Set(gblNewTaskRevisionSelected,false);
Set(gblDefaultTaskDescription,FluentDetailsList1_1.Selected.webUrl);
Now lines 2 and 3 are already going to handle the task type for me based on how I’ve already configured those radio button controls! But we will need to do something for lines 1 and 4 for the task title and description.
Select the task title input box you’re using and then navigate to the default property and add the following against it.
gblDefaultTaskTitle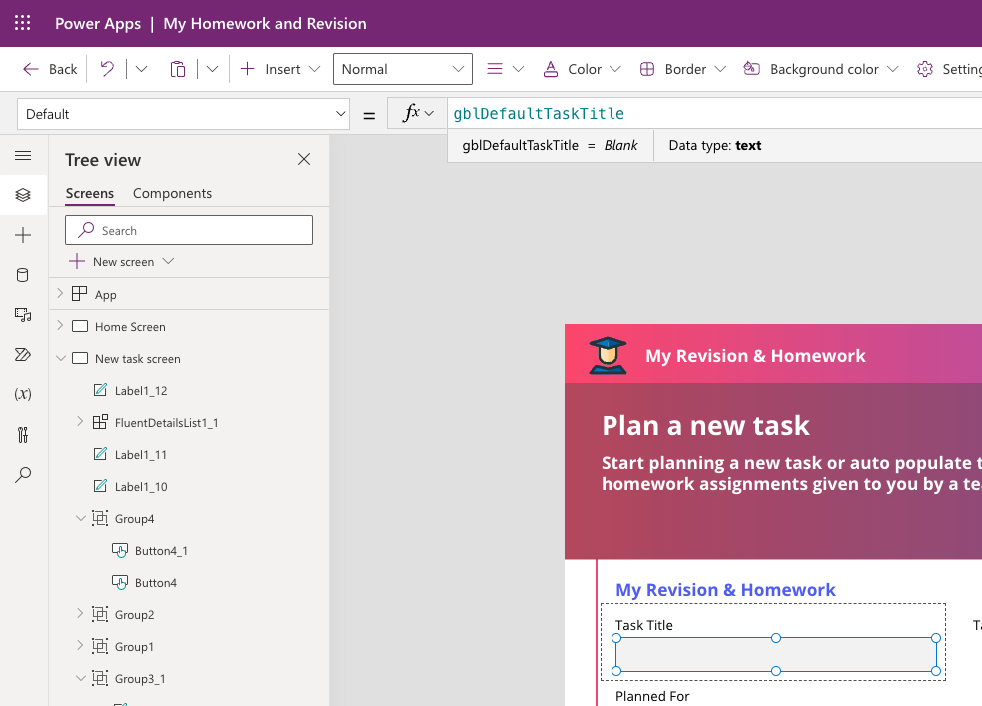
Then for the input box you are using for the task description, set the default property to the following…
gblDefaultTaskDescription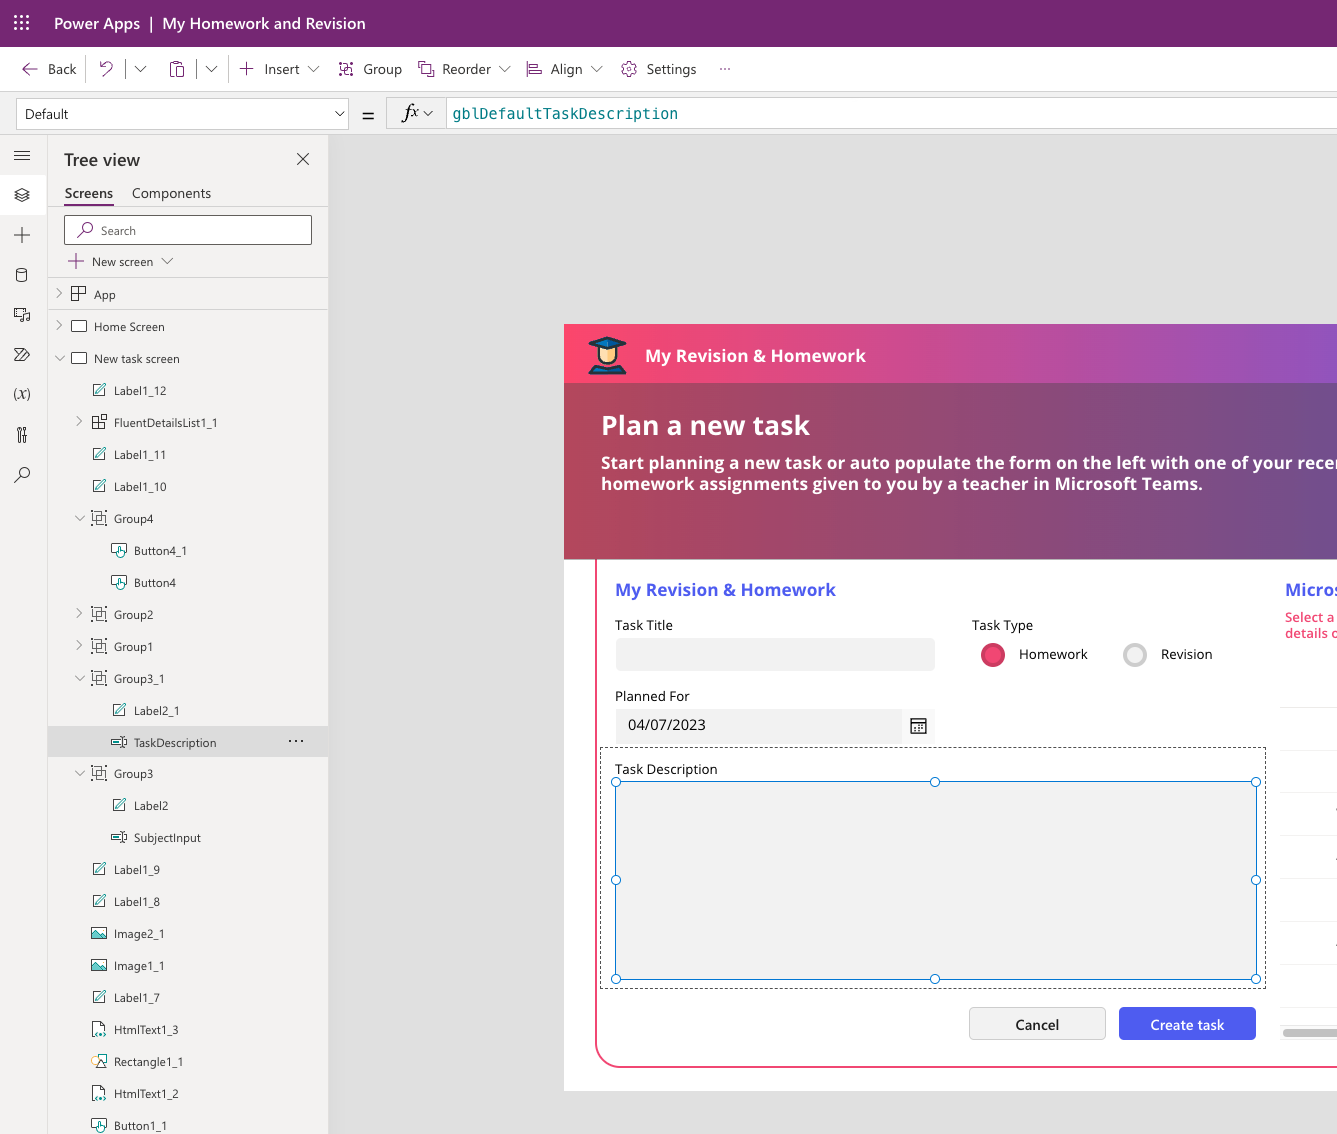
Now we’re populating the task title with the Teams assignment title, the description with a link to the assignment in Teams for greater detail, and we’re setting the task type to Homework which will apply to the calendar event as a category/tag.
Finally all students need to do is set the date they want to do the work and outlook will block out 15 minutes on that day for them to do the work. They can then move the event in their calendar if the time isn’t right!
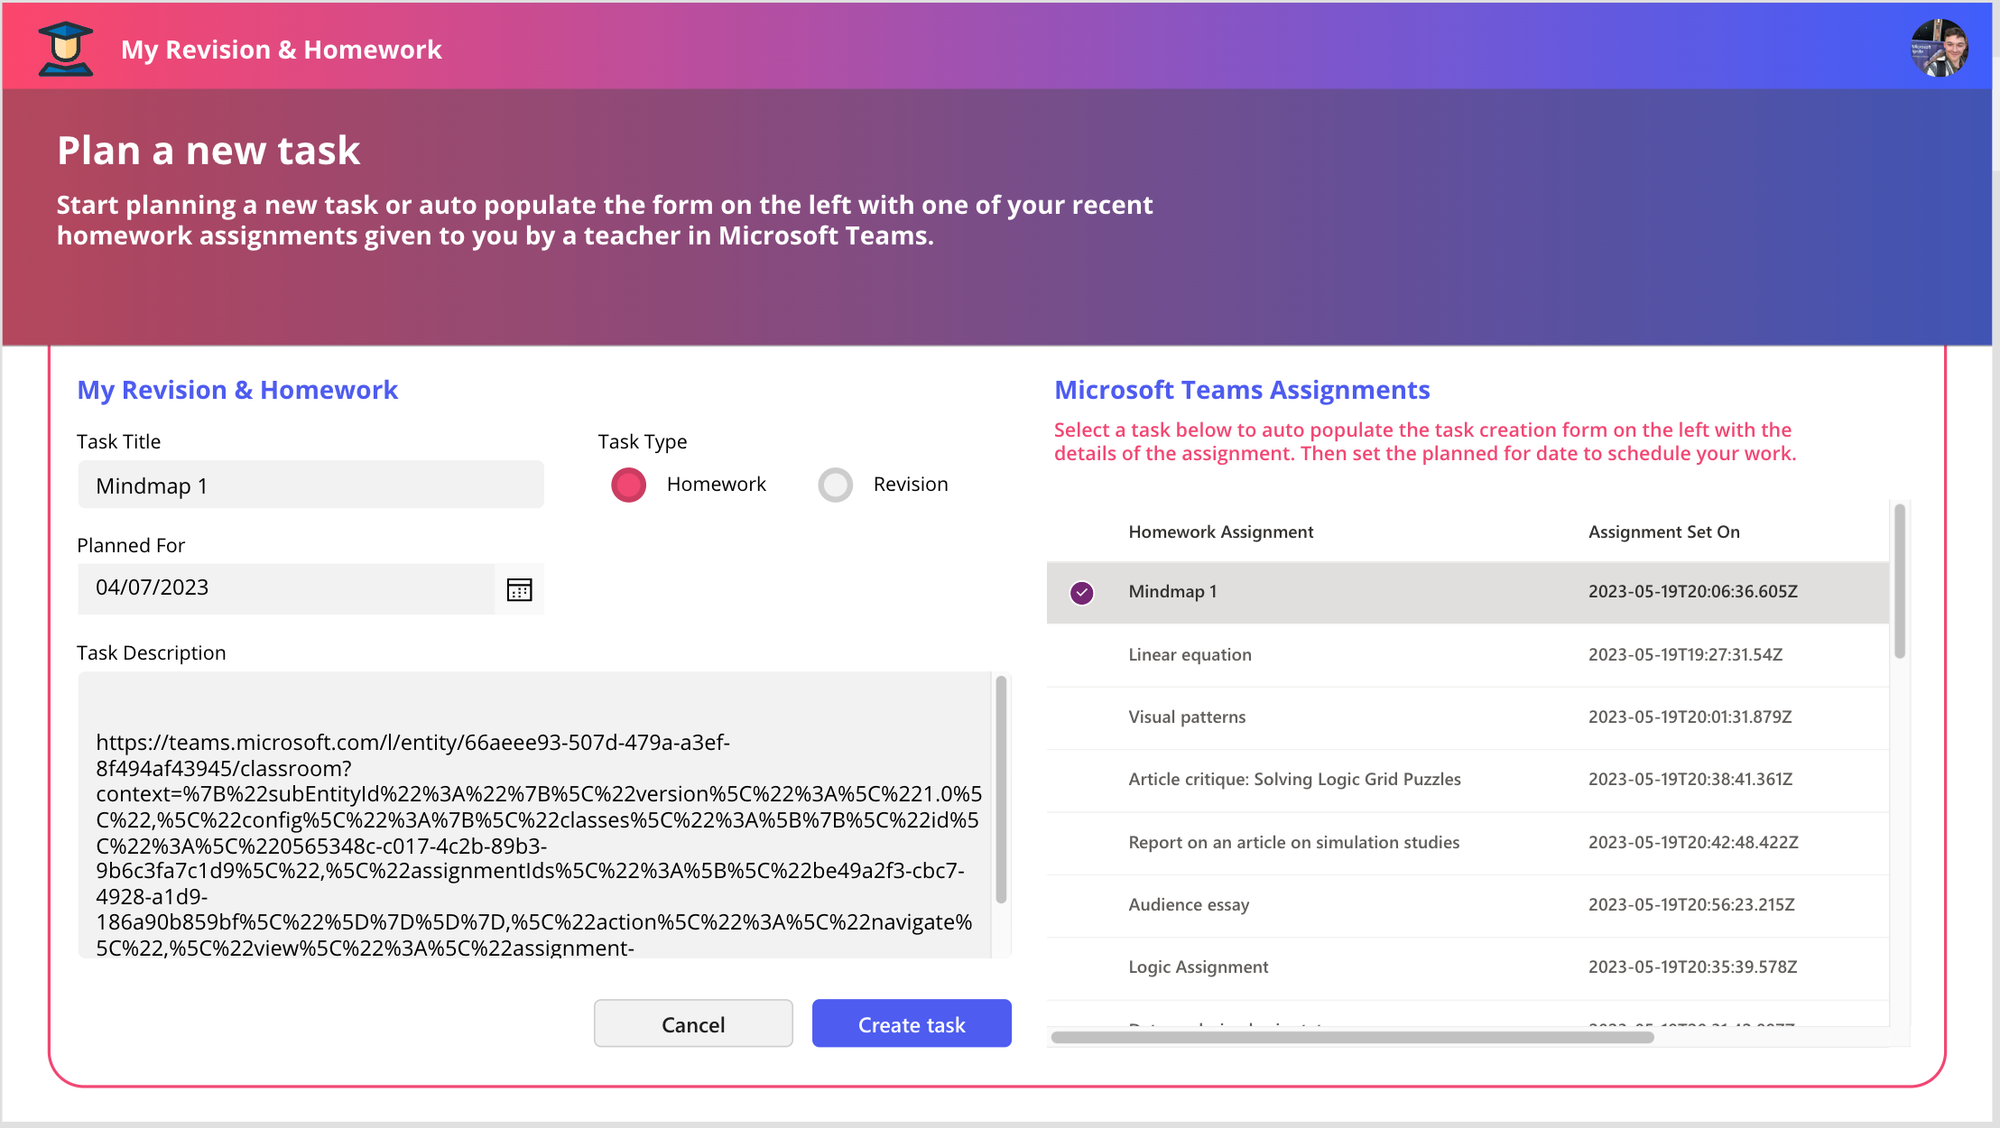
Example
So I’m going to select one of my Microsoft Teams assignments and look at how the form gets populated ready for me to set a date I want to complete the task and then create it in my calendar with the click of a button!
Buttons tidy up
So lets finalise the screen by tidying up some buttons. Let’s set the OnSelect of the cancel button to the following code…
Reset(SubjectInput);
Reset(PlannedForDate);
Reset(TaskDescription);
Set(gblNewTaskHomeworkSelected,false);
Set(gblNewTaskRevisionSelected,false);
Set(gblDefaultTaskDescription,Blank());
Set(gblDefaultTaskTitle,Blank());
Navigate('Home Screen');
Then lets add the same code to the button of the create task button, removing the navigate function so we stay on the create task screen, but also adding a notify as part of an IfError() statement to notify the user things have worked, and report if they didn’t. Things should look a bit more like this now…
IfError(Office365Outlook.CalendarPostItem(
    "Calendar",
    DateAdd(
        PlannedForDate.SelectedDate,
        15,
        TimeUnit.Minutes
    ),
    PlannedForDate.SelectedDate,
    SubjectInput.Text,
    {
        Body: {
            Content: TaskDescription.Text,
            ContentType: "HTML"
        },
        Categories: [{Value: If(gblNewTaskHomeworkSelected,"Homework Task","Revision Task")}]
    }
);
Notify("Your task was successfully planned in!", NotificationType.Success,10000);
Reset(SubjectInput);
Reset(PlannedForDate);
Reset(TaskDescription);
Set(gblNewTaskHomeworkSelected,false);
Set(gblNewTaskRevisionSelected,false);
Set(gblDefaultTaskDescription,Blank());
Set(gblDefaultTaskTitle,Blank());,
Notify("Something went wrong, please try again later.", NotificationType.Error,10000);)
Upcoming content
Awesome! So we’ve finished the plan a new task screen! Now we’ve almost got a fully working application… but we’re still going to take this one a bit further. In tomorrows post we’ll start to work on the screen that will take our homework assignments and revision tasks and surface relevant articles that would help us with the work!
Make sure you’re subscribed to my blog to get this upcoming content, and all the goodies after that too! 💖
Subscribe