

Do you ever have a need to remind users of actions that may need to be taken on various records depending on different data around that record? It could be of a ‘pending’ status or the last modification date might’ve been quite a while ago indicating that it hasn’t been worked on in a while ago. Well, we can remind those users to take action on records using briefing emails which we can design and automate in Power Automate.
Recurrence
So… first we’re going to want to look at the correct trigger in a Power Automate flow for this kind of automation. We won’t have an automated cloud based trigger that we can use here because that would depend on someone taking an action, which is in fact the opposite of what we’re looking for. Instead, we need something based on a period of time that has past since the last time we ran the flow. For this, we’re going to use the recurrence trigger.
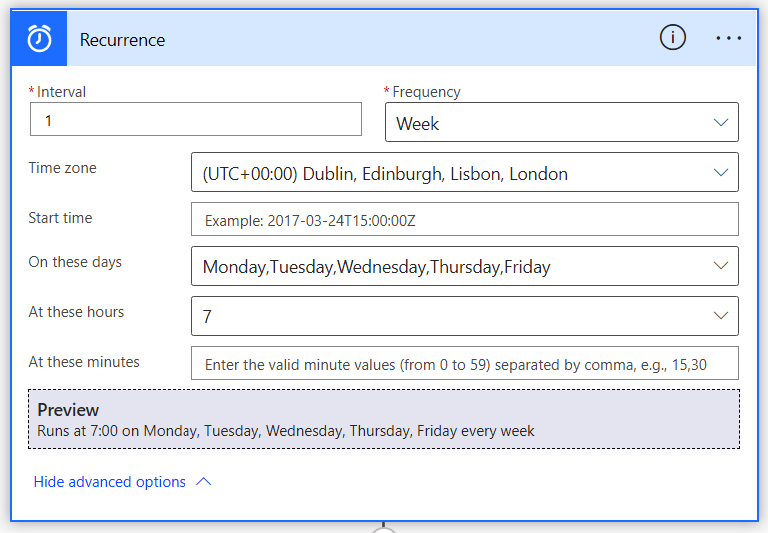
Within our trigger, we are going to need to do some simple configuration. First we’re going to select the frequency at which our interval runs the flow. In this case mine is set to week and the interval is set to 1, so this flow will run every week. Then further down however, we can see that there are further options to determine when the flow will trigger. Here we can see I have specified weekdays for this flow to run at 7 am. So to simplify, this flow will run at 7 am on weekdays, every week.
Get Items
Now we need to obtain the data we want to remind people about. In this case, for simplicity, I am using a SharePoint list to demonstrate how we can get items for using in our email. If you’re using another data source, keep in mind that you might need to use different filters to obtain the same results. For example in Dataverse, you might need to use an XML query when using the list rows action.
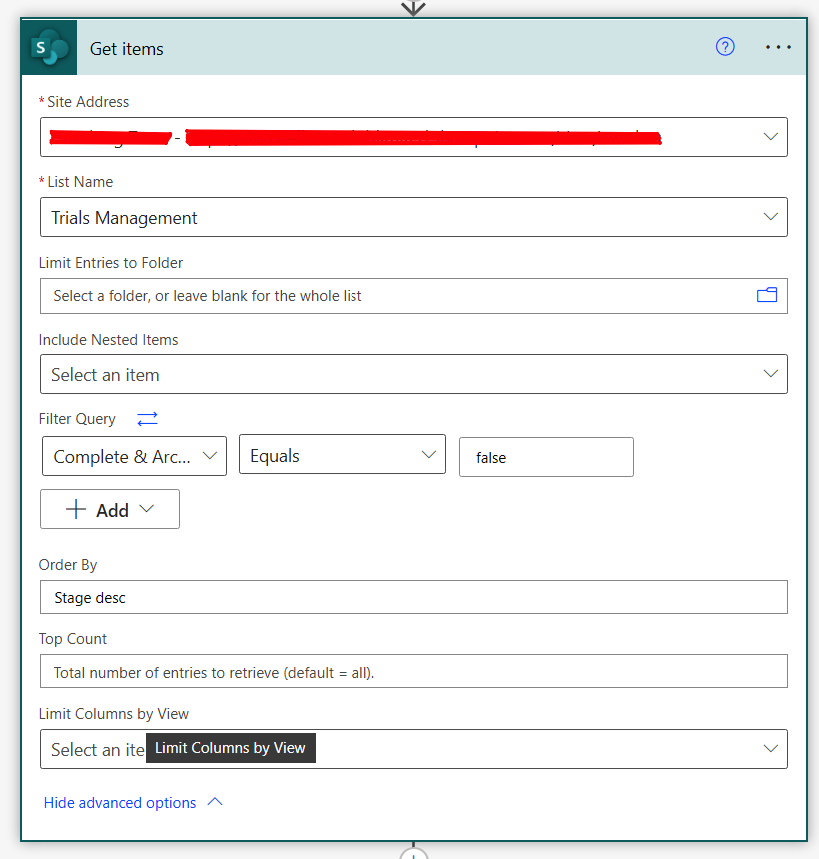
Here I have selected my SharePoint site and my list, then I am doing some work with the OData Query, which has quite nicely been redesigned recently to allow for further low-code development. It is now possible to select the field, comparison and value as opposed to having to write the OData Query syntax. You should note however that some data types won’t just show up in the column drop down, so you might have to grab these from SharePoint. You should further ensure that you take the column name and not the display name of the column which can be changed unlike the underlying column name.
So, in the first drop down of the filter query, you want to add your column, then in the second drop down select the appropriate method to compare the column to the value. And then fill in the value in the third field. For yes/no columns the values are ‘true’ and ‘false’.
If you have more advanced filters to implement, you can do this by adding further rows to your query, or even groups.
Create HTML Table
So… now we have our records to do something with! We want to put these in an email to our users with some further information to remind them to take action around. We want to display these in a visual form that is easy to understand as opposed to lines of data that aren’t too easy to read! To do this, we are going to create a HTML table.
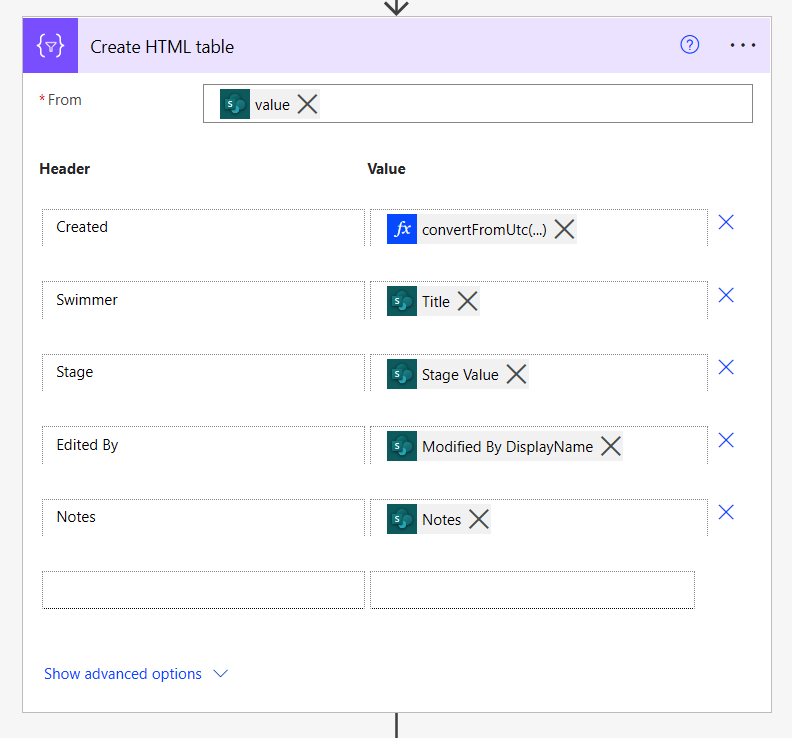
In our new action to create a HTML table, we want to put some dynamic content in the ‘from’ field so our table knows where the data is that we want to populate it with.
Then, we’re going to add our table headers and values for how we want our data to be presented. This is if you have selected the option for custom columns which is recommended so you can manipulate your data in the way that best suits your users.
So… from here, we now have a HTML table ready to send to our users.
Though… not so fast, whilst we have put things in a table to make it easier for our users to understand, this is going to be an extremely basic looking table that potentially won’t satisfy our users needs at all.
To fix this issue, we need to add some styling to our HTML using CSS.
Where does the CSS go?
But hold on… whilst we have some CSS code to the right there… where do we actually put this and how can we apply it to our table?!
To apply our styling to our table we want to put it inside a compose action and take the outputs from that action.
So add a compose action to your flow, and simply paste in the CSS code. That’s all you need to do at this point.
<style> Table { background-color: #EEEEEE; border-collapse: collapse; width: 100%; } Table td, Table th { border: 1px solid #ddd; padding: 4px 4px; } Table th { font-size: 13px; padding-top: 12px; padding-bottom: 12px; text-align: left; background-color: #a41c2a; color: white; } </style>
Let’s send our email!
So now we can send our email. This is an important step because it’s where we’re going to apply our CSS to our HTML to produce a nicely formatted table for our users to reference.
You’re going to want to add a new step to your flow being the ‘Send an email (V2)’ step. Then you can fill in the various required fields including the to field, the Subject and Body. Then within the body of your email, you’re going to want to place your CSS and HTML table somewhere.
Find a space in the body of your email, and you want to put the dynamic content from your ‘Compose’ action which should be labelled ‘Outputs’, and then follow it directly with the dynamic content from your ‘Create HTML Table’ step which should be labelled ‘Outputs’
I’d recommend sending this kind of email to a distribution list you can add people to or a mail-enabled security group. This will make it easier for IT admins and non-developers to allow for more people to get these notifications. I would also recommend switching the importance of the email on the Send an Email step to the value you think is appropriate, Power Automate defaults this to a ‘low priority’ email.
And there you have it!… You’re now sending automated emails with reminders to people based on records they might’ve not edited in a while or might’ve left pending! But remember that is down to the condition you created when filtering your get items step!
I hope this helps 🙂