

ALM or Application Lifecycle Management is an important consideration when building Power Platform solutions, and isn’t something to ignore when choosing SharePoint as a primary source of data.
In this post, I’ll explain how to manage ALM when building SharePoint based Power Platform solutions including having separate data stores for all of your environments from Development through to Production.
Application Lifecycle Management
To provide a bit more background, application lifecycle management or ALM, is the approach we take to developing an application between us building it and us handing it over to our end users, and even the period after that. Let’s take the simple view of it for now though as the process of going from developing a solution, to delivering it to our end users.
For this, we will go through 3 or 4 stages which are Development, Test, UAT and Production. These stages are most commonly the 4 here, but can vary based on development team’s requirements.
For more information on ALM, check out these posts:
SharePoint Sites & ALM
So, to support the process of ALM in the same way that we would with a Dataverse solution, we’ll need 4 places to store our data. When using SharePoint, this means having 4 SharePoint sites with identical SharePoint list schemas. But how do we do this?
Well… we want to start with our development site. You can create a SharePoint site as you normally would to use for the solution you’re building, and simply build it out with the schema you need. Create the lists you need, create the columns you need etc.
Now you might be wondering, okay… but once I need to move to my test environment and my UAT, or even production environments, how do I end up with the same schema in those sites, and how do I connect my data in different places to those sites without creating unmanaged layers on my solution everywhere!
First I’ll start with how you can deploy your schema to your Test, UAT and Production SharePoint sites, which you’re effectively going to treat each as environments that match up to your Power Platform environments. We’ll worry about connecting each site to each environment later.
To deploy your schema to your other sites, you’re going to want to use the following script.
$ExistingSiteUrl = "https://yourtenant.sharepoint.com/sites/yourexistingsite"
$SiteTemplateFile = "\Template.xml"

Connect-PnPOnline -Url $ExistingSiteUrl -PnPManagementShell
Get-PnPSiteTemplate -Out $SiteTemplateFile

$TargetSiteUrl = "https://yourtenant.sharepoint.com/sites/yourtargetsite"

Connect-PnPOnline -Url $TargetSiteUrl -PnPManagementShell
Invoke-PnPSiteTemplate -Path $SiteTemplateFile
If you want a bit more guidance on using this script, check out the post I wrote on the Microsoft 365 Platform Community Blog here – Creating a SharePoint site using the configuration of another site with PnP Powershell
Environment Variables Setup in Development – Data Source
So now you know how to deploy your schema to your SharePoint Sites/Environments… lets talk about connecting our solution up to our environments in multiple places.
In your Dataverse / Power Platform solution where you’re packaging things to support the ALM process, you’ll need to take advantage of environment variables. You’re going to want to be referencing environment variables in both your Canvas Apps and Power Automate Cloud Flows, rather than SharePoint sites directly as hard coded values. This means we can change the environment variables in future environments to update the sites without creating unmanaged layers on our application layer objects.
In your solution you’re going to want to start by creating an environment variable for your SharePoint site.
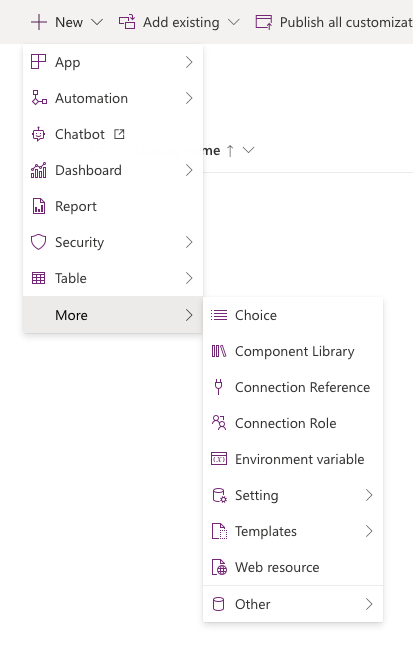
To do this click new, then more, then environment variable.
Now give your variable a name and set the data type as data source. Now you can select SharePoint in your data type dropdown, and select a connection you’ve got in your environment. Now in parameter type you’ll want to select site. Now add a current site value and select your development site.
Now you want to follow the same process but instead of selecting site in the parameter type, select list and select the SharePoint list you want to use in your solution. You’ll need to select the site variable you want to reference, then select the list. You’ll want to repeat this for every list you have in that site that you want to use in your solution.
Power Apps
When it comes to connecting to your SharePoint site in your Canvas Apps, you need to tick a few different boxes to make your connection, and we’re going to make our connection by referencing our environment variables. This way when we update our variable values in our future environments to match their ALM stage SharePoint sites, our app will reference those sites.
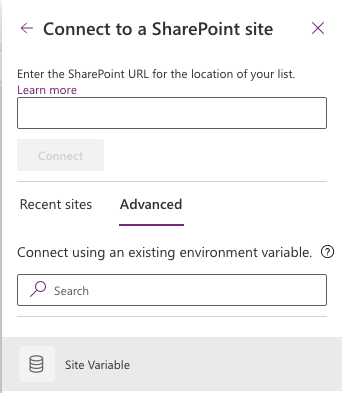
First go to your data sources area in your Canvas App, now select SharePoint (you might have to search for it), and select your connection. Now, you’ll see the ‘connect to a SharePoint site’ pane appear. Here you don’t want to just select a site. Select advanced, and then select your site variable.
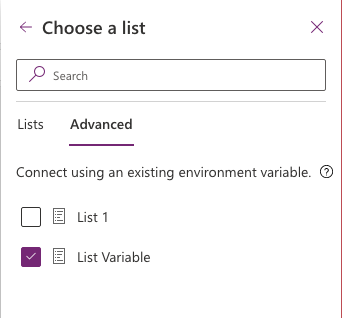
Now you’ll see your lists appear. Don’t just select the ones you want. Again we need to select the advanced tab to see our list environment variables, and select the ones you want to use in your app which will reference actual lists.
That’s it! Now you’ve connected your list variable to your canvas app and your app is referencing the SharePoint site and list that is stored in your environment variables. Now when you connect to other sites by changing your environment variable value in target environments where your solution is managed, your app will reference those different sites.
Power Automate
Now we’ll take a look at Power Automate. With Power Automate we need to use environment variables in our flows to reference those dynamic sites instead of a hard coded site which will stay as development if we deploy things like this. It’s almost a bit easier with Power Automate because you’ll see all of your environment variables as dynamic content available in your flows!
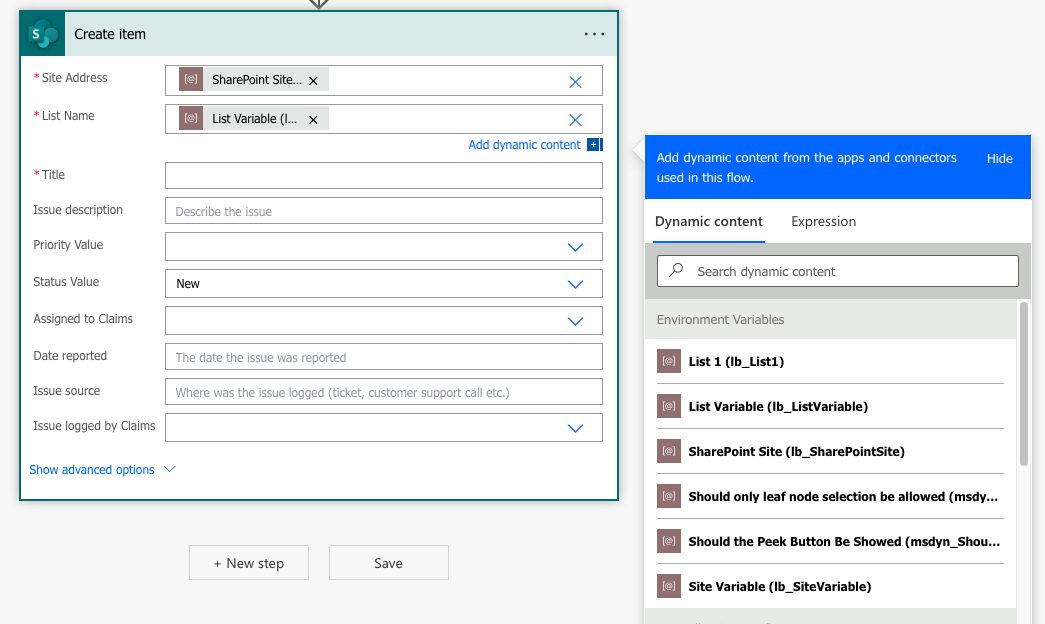
On SharePoint actions in your flows, simply use your site environment variable from dynamic content in your site address input. Then when the action asks for the list, again enter a custom value and use your list environment variable which will come from your flows dynamic content!
It’s that simple! Now your flows are referencing the sites and lists in your environment variables.
Updating SharePoint Sites in Target Environments – Deployment
The final piece of the story is deploying your Power Platform solution. When you deploy your Power Platform solution, you need to update your environment variable values so that in target environments you’re now referencing the right sites.
Before you export your solution from development as managed, clear out / delete all your current values in your data source environment variables. Now export your solution.
Now when you import your solution to test, UAT, production etc. You will be asked to select new environment variable values. This is where you’ll select your site that corresponds to the environment you are in.
Now your solution is using the data for the site that corresponds to your environment for the stage you are at in ALM. Once you’ve gone through the entire process once, you’ll have all the environment variable values populated unless you’re introducing new lists. In the case that you aren’t introducing new lists, you no longer need to clear out your values before deployment, because those variables already have values in them in our target environments, so you will just be upgrading things for future deployments.
Remember if you make a change to your data schema in development, you need to run your SharePoint PnP script to deploy these site changes across your other SharePoint sites. You’ll also need to then redeploy your Power Platform solution so your apps and flows pick up the new schema of your site.
I hope this post helped! If you didn’t understand something or have any questions let me know in the comments below!